Visual Studio Toolbox
Apart from using Flexible TreeView component in code, it provides extensive design-time support that begins with installing the control in Visual Studio Toolbox. After installation, you can drop the control onto the form in the designer to adjust its properties at design-time.
The process of installing Flexible TreeView in Visual Studio Toolbox differs depending on your application's .NET version.
For .NET Framework Applications#
To design the Flexible TreeView control in a .NET Framework application, install it in Visual Studio Toolbox.
Automatic installation#
When installing Flexible TreeView on your development machine, enable the Register in GAC installation option and select your Visual Studio version to integrate Flexible TreeView into its Toolbox.
After installation, the Visual Studio Toolbox will contain the Flexible TreeView group and its controls. If the Flexible TreeView group does not appear in Toolbox after installation, follow the manual installation steps below.
Manual installation#
To install Flexible TreeView in Visual Studio Toolbox manually:
- Start Visual Studio and create an empty Windows Forms project
-
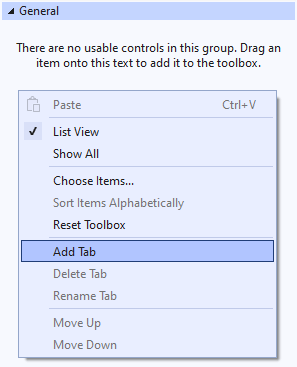
Open Visual Studio Toolbox, right-click on empty space and create a new tab
Flexible TreeViewby selectingAdd Tab:
-
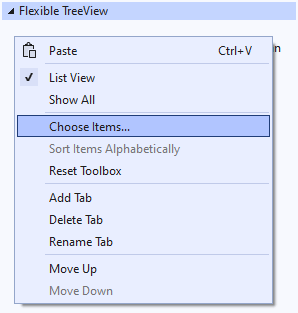
Right click on the created tab and select
Choose Items:
-
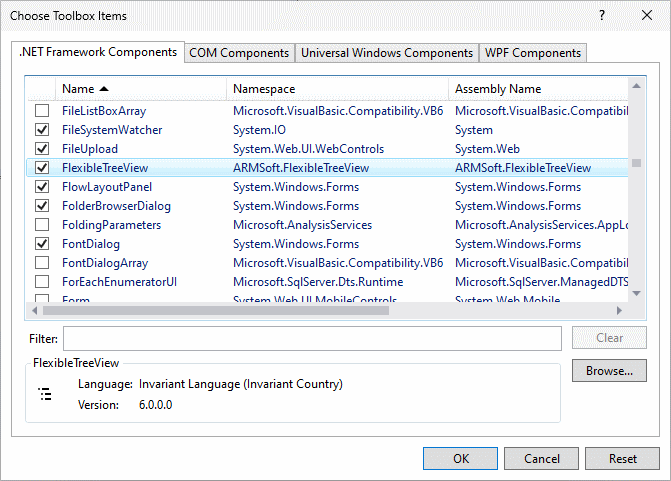
In the opened window, locate and select the
FlexibleTreeViewandTreeComboBoxcomponents:Note
If
FlexibleTreeViewcomponent is not listed, clickBrowse...and selectBin\net46\ARMSoft.FlexibleTreeView.dllfrom the Flexible TreeView installation folder
-
Click
OK. TheFlexible TreeViewandTreeComboBoxcomponents will appear in the Toolbox tab.
For .NET Applications#
For .NET 6.0 or later applications, reference Flexible TreeView as a NuGet package so it will appear in Visual Studio Toolbox:
- In Solution Explorer, right-click your project and select
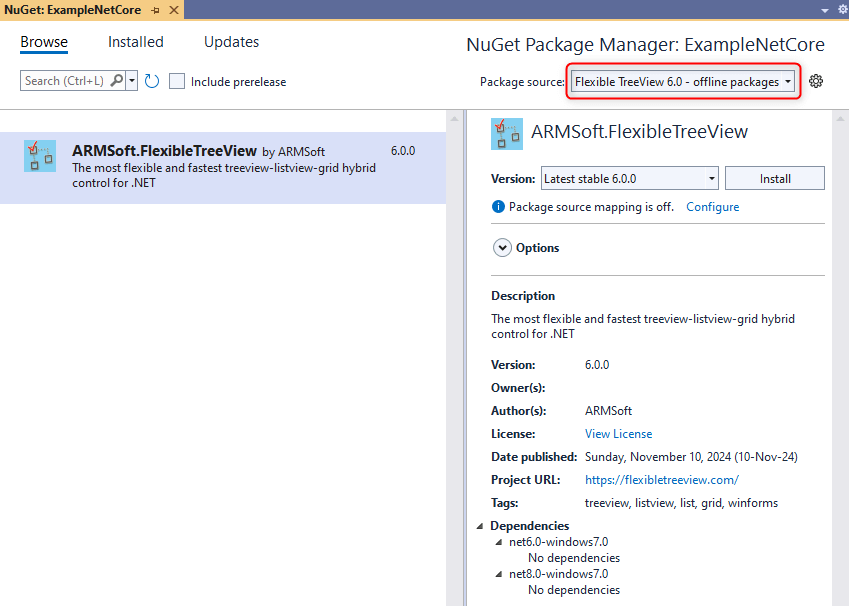
Manage NuGet Packages - In the NuGet Package Manager window, select the
Flexible TreeView <version> - offline packagespackage source:

Note
The Flexible TreeView <version> - offline packages package source installs automatically with Flexible TreeView.
-
Select the
ARMSoft.FlexibleTreeViewpackage and clickInstall -
Enable the
Automatically Populate Toolboxsetting in Visual Studio ("Tools | Options | Windows Forms Designer | General") and restart Visual Studio if previously disabled
After installing the NuGet package, the FlexibleTreeView and TreeComboBox components will appear under the ARMSoft.FlexibleTreeView toolbox group when you open the form designer.
Clearing NuGet cache#
If you've upgraded Flexible TreeView to a new version but the old version still appears in your project, it might be because NuGet has cached the old package and continues to use it.
Follow these steps to clear the NuGet cache:
- Close all Visual Studio instances
- Delete the cached Flexible TreeView package:
- Navigate to
%USERPROFILE%\.nuget\packages - Delete the
armsoft.flexibletreeviewfolder if present
- Navigate to
- Reopen Visual Studio and rebuild your application