Core concepts
Flexible TreeView offers a different paradigm for data presentation and manipulation compared to standard treeview controls available on the market. This flexibility is essential for efficiently meeting project requirements.
To address any potential misunderstandings about how to begin using Flexible TreeView, below is a step-by-step guide to help you get started smoothly.
Flexible TreeView parts#
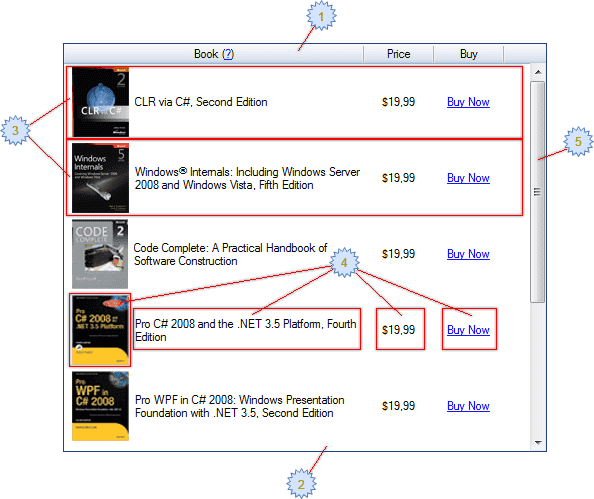
Flexible TreeView consists of these parts:
- optional columns header
- treeview display area
- nodes
- node controls
- scroll bars

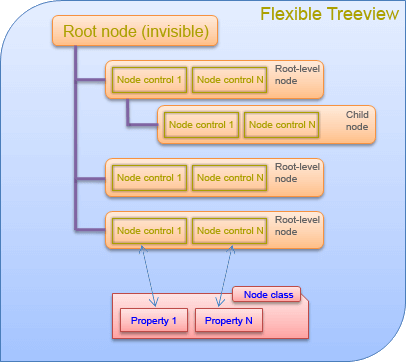
Flexible TreeView structure architecture#

Node controls#
Node controls are the key features that distinguish Flexible TreeView from other tree view controls. Their purpose is to retrieve data (from a node instance, from an external source, etc.) and present it in a specified format within the treeview. Essentially, node controls act as data presenters and allow users to edit and update that data.
To display your data, you must add at least one node control to the treeview. If you find that nodes are present (and selectable) but no data is displayed in the treeview, there are a few potential reasons: either no node controls were added to the treeview, your data binding is broken, or your data is actually empty.
To get started with node controls, the following example demonstrates how to add a textbox node control and a node with a title that is displayed by this node control.
If the treeview has any columns, each node control must be attached to its respective column; otherwise, the node control won't be visible in the treeview.
To learn more about node controls, read this introductory topic.
Nodes#
Node serves as a "data" container for the treeview, meaning that—except in data-bound mode—the node typically contains the data to be displayed in the treeview.
Each data property of a node that needs to be shown in the treeview must be bound to an appropriate node control via DataFieldName, as demonstrated here.
The built-in Node class already contains several data properties, such as Text, CheckState, and Tag, which can be used to store user data and display it in the treeview, as illustrated below.
// Add node controls.
NodeTextBox ncUserName = new NodeTextBox();
ncUserName.DataFieldName = "Text";
ncUserName.AttachTo(tree);

NodeCheckBox ncUserVerified = new NodeCheckBox();
ncUserVerified.DataFieldName = "CheckState";
ncUserVerified.AttachTo(tree);

NodeTextBox ncUserTag = new NodeTextBox();
ncUserTag.DataFieldName = "Tag";
ncUserTag.AttachTo(tree);

// Add nodes.
Node node = new Node("John Smith");
node.CheckState = eCheckState.Checked;
node.Tag = "Dummy user";
node.AttachTo(tree);
' Add node controls.
Dim ncUserName As New NodeTextBox()
ncUserName.DataFieldName = "Text"
ncUserName.AttachTo(tree)

Dim ncUserVerified As New NodeCheckBox()
ncUserVerified.DataFieldName = "CheckState"
ncUserVerified.AttachTo(tree)

Dim ncUserTag As New NodeTextBox()
ncUserTag.DataFieldName = "Tag"
ncUserTag.AttachTo(tree)

' Add nodes.
Dim node As New Node("John Smith")
node.CheckState = eCheckState.Checked
node.Tag = "Dummy user"
node.AttachTo(tree)
If additional data properties are required, a class that inherits from the Node class, with the necessary data properties, needs to be declared, as shown below.
// Custom node class.
class OrderNode : Node
{
    public int OrderId { get; set; }
    public decimal OrderAmount { get; set; }
}

// Add node controls that handle these new data properties.
NodeTextBox ncOrderTitle = new NodeTextBox();
ncOrderTitle.DataFieldName = "Text";
ncOrderTitle.AttachTo(tree);

NodeNumeric ncOrderId = new NodeNumeric();
ncOrderId.DataFieldName = "OrderId";
ncOrderId.AttachTo(tree);

NodeNumeric ncOrderAmount = new NodeNumeric();
ncOrderAmount.DataFieldName = "OrderAmount";
ncOrderAmount.AttachTo(tree);

// Add node.
OrderNode node = new OrderNode();
node.Text = "First order";
node.OrderId = 1;
node.OrderAmount = 100;
node.AttachTo(tree);
' Custom node class.
Class OrderNode
    Inherits Node

    Public Property OrderId As Integer
    Public Property OrderAmount As Decimal
End Class

' Add node controls that handle these new data properties.
Dim ncOrderTitle As New NodeTextBox()
ncOrderTitle.DataFieldName = "Text"
ncOrderTitle.AttachTo(tree)

Dim ncOrderId As New NodeNumeric()
ncOrderId.DataFieldName = "OrderId"
ncOrderId.AttachTo(tree)

Dim ncOrderAmount As New NodeNumeric()
ncOrderAmount.DataFieldName = "OrderAmount"
ncOrderAmount.AttachTo(tree)

' Add node.
Dim node As New OrderNode()
node.Text = "First order"
node.OrderId = 1
node.OrderAmount = 100
node.AttachTo(tree)
To learn more about nodes, read this introductory topic.
Columns#
Columns are designed to visually separate the data rows within a treeview.
Since data is presented solely by node controls, each node control must be bound to a column; otherwise, the node control will not be visible in the treeview.
To add a column, create an instance of the TreeColumn class, as demonstrated below.
The default width of a column is 150 pixels. To make it wider, use the TreeColumn.Width property.
To learn more about columns, read this introductory topic.
Treeview#
The treeview serves as an aggregating "container" for node controls, nodes, and columns. To access these components, use the NodeControls, Nodes, and Columns treeview properties, respectively.
To learn more about the treeview, read this introductory topic.